If you are new to wallaby.js, it is an intelligent test runner that solves the fundamental issue of being able to provide an instant feedback from your tests as you write your code, no matter how large your codebase is. Wallaby displays test execution results including code coverage right in your code editor. In this blog post I will cover new features that have been added during the last few weeks.
TypeScript, CoffeeScript, ES7
Up until recently wallaby.js only supported JavaScript (up to ES6 plus React JSX). You could and can of course use any other language with preprocessors and wallaby.js can run tests for you, but it wasn’t able to display code coverage for anything but JavaScript (up to ES6 plus React JSX).
Today I am happy to announce that wallaby.js adds support for TypeScript and CoffeeScript. We also now support ES7 features via Babel. Whether you have your whole codebase in one (or more) of those languages, or just prefer to write your tests using a language compiled to JavaScript - wallaby.js can display code coverage for the language of your choice.
There is nothing special to configure to start using new features, just list your files in wallaby configuration file:
and you are ready to get real time coverage for TypeScript:
or CoffeeScript
There are sample projects with a couple of source files and wallaby.js configuration file in CoffeeScript sample and TypeScript sample repositories to get you started quickly.
If you would like to start using ES6 and ES7 features in your tests or application code, wallaby.js has got you covered.
Wallaby.js ships with a built-in Babel compiler integration. Simple configuration:
and you are ready to enjoy ES7 magic with all wallaby.js features, such as async/await:
And of course new features work with existing features, so you may use all combinations of supported technologies. Whatever your stack looks like, for example, CoffeeScript with node.js or io.js, TypeScript with CommonJs via Webpack or ES7 async/await in your React.js application along wth JSX - wallaby.js can provide you real-time code coverage and instant feedback from your tests.
As I have promised before, we are (and will be) providing more and more ways to extend wallaby.js the way you need. For example, new languages support is added with a new extensibility concept called ‘compilers’. With wallaby.js compilers extensibility point you can also
your own custom compiler for any language.
Browserify and Webpack
Some of you are happily using CommonJs or AMD and NPM modules in browser with a solution to package code bundles/chunks for deployment. To support nice and fast code testing for such scenarios, a couple of weeks ago we have added a new extensibility concept to wallaby.js called ‘postprocessor’. With a stateful postprocessor it is possible to extend Wallaby core to leverage incremental compilation and caching features of Browserify and Webpack to keep providing an instant feedback from your tests when running them with wallaby.js.
Both extensions, Wallabify and Wallaby-Webpack, are open source, pull requests with improvements are very welcome.
In the above mentioned repositories you may find some recommendations on how to configure wallaby.js to use with Browserify and Webpack. You may also find simple examples with wallaby.js configuration Browserify sample repository and Webpack sample repository.
That’s it for the blog post, thanks for reading and hope it helps you to get started with new wallaby.js features in your project. Follow us on twitter to stay updated.
Wallaby.js is a continuous test runner. It runs your tests as you type and displays various results right inside your code editor. Wallaby.js allows you to test your React applications and get an instant feedback from your tests, no matter how large your codebase is and whether you are using browser environment or node.js with jsdom. With wallaby.js, you can use any popular testing framework of your choice.
In this article I will describe how to test React application, specifically React components, using Jasmine and wallaby.js with code coverage, including code coverage inside JSX element JavaScript expressions. You can find the full code in this repository.
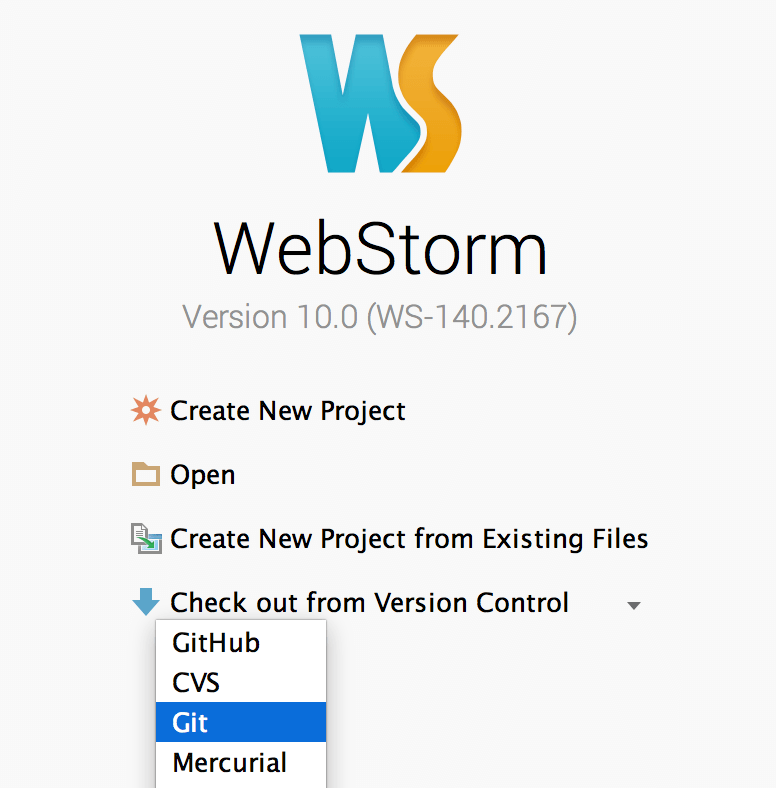
First, if you haven’t done it already, go ahead download and install wallaby.js. Then clone this repository from WebStorm or command line, open the project and install dependencies.
Next, create wallaby configuration file for your project. It is pretty straightforward, especially if you have used something like Karma before. You can name it wallaby.js and put the following code into it:
In the configuration file, we have specified the list of our application files and tests using glob patterns. We are also setting up a compiler to convert jsx files code to ES5 (so it can run in browser) using react tools.
We are ready to go now - start wallaby.js run configuration using Run menu or keyboard shortcut.
When starting for the first time, wallaby.js will download and install some dependencies. Those include node.js, that is used to run wallaby.js, and PhantomJs headless browser engine to run your tests in. The installation may take a minute or so and only happens once.
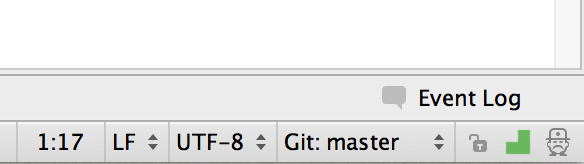
After the start, wallaby.js displays its tool window at the bottom:
and its status indicator at the right bottom corner of the window.
The indicator displays a spinner when your tests are running, red icon if any of the tests is failing and green icon if all tests are passing. The tool window Failing tests tab displays the information about failing tests, such as error stacks and failed expectation details.
Once started, you don’t need to restart wallaby.js run configuration to run your tests, as it does it automatically, as you change your code. You can hide the tool window by using the Hide icon in its right top corner, as you will be getting the information about failing tests right in the context of the code that you’re editing. You can always get the tool window back by clicking wallaby.js status indicator.
Now, let’s see wallaby.js in action. This project contains a sample implementation of a composite user profile control
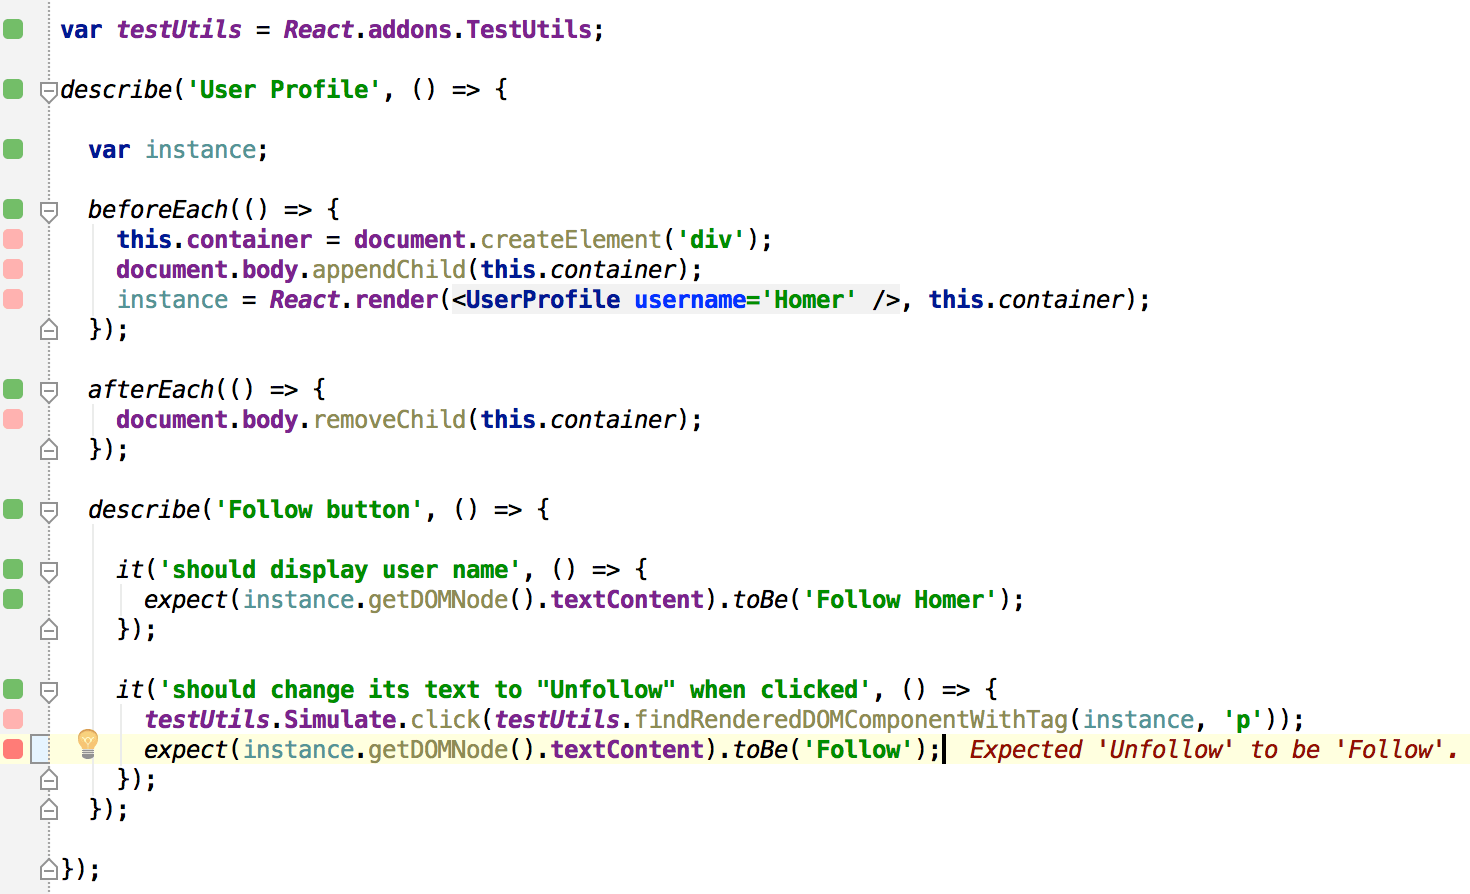
Now, let’s open the application spec test/avatarSpec.jsx.
'use strict';vartestUtils=React.addons.TestUtils;describe('User Profile',()=>{varinstance;beforeEach(()=>{this.container=document.createElement('div');document.body.appendChild(this.container);instance=React.render(<UserProfileusername='Homer'/>,this.container);});afterEach(()=>{document.body.removeChild(this.container);});describe('Follow button',()=>{it('should display user name',()=>{expect(instance.getDOMNode().textContent).toBe('Follow Homer');});it('should change its text to "Unfollow" when clicked',()=>{testUtils.Simulate.click(testUtils.findRenderedDOMComponentWithTag(instance,'p'));expect(instance.getDOMNode().textContent).toBe('Unfollow');});});});
We are testing that the “Follow” button works as expected by rendering a user profile, checking the button text, clicking it and checking its changed text.
When wallaby.js is up and running, you should be able to see coverage indicators in the gutter of the code editor in your tests and other source files.
Gray square means that the source line is not covered by any of your tests.
Green square means that the source line is covered by at least one of your tests.
Yellow square means that the source line is only partially covered by some of your tests.
Red square means that the source line is the source of an error or failed expectation, or is in the stack of an error.
Pink square means that the source line is on the execution path of a failing test.
On any line of the source code you can hit Alt + Enter (or use the light bulb icon) to display the list wallaby.js context actions. You can read more about all actions in the documentation.
For this example, let’s mute one of the tests. The easiest way to do this is to change it test function to xit. This will make Jasmine to ignore the test.
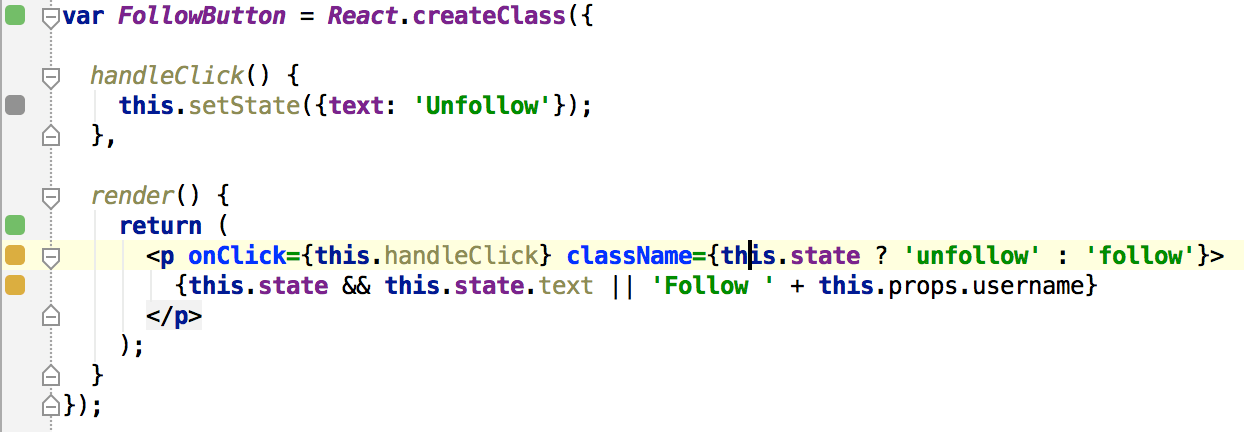
As you can see, wallaby.js immediately executes the test and marks the test lines with gray markers, because they are not executed anymore. It also changes src/components/FollowButton.jsx file indicators.
We can also see that handleClick function is not invoked anymore, so it has a gray indicator next to it. We also see yellow indicators next to the JSX element JavaScript expression lines of code. It means that the expression code is only partially covered by our tests. To know what exactly is NOT covered, let’s hit Alt + Enter and use ‘Show file uncovered regions’ context action.
Now we clearly see what is exactly not covered inside the lines with the yellow coverage indicator. Because we have muted the test that was clicking the button, unfollow CSS class is not assigned to the button tag and because handleClick function is not invoked anymore, this.state is undefined so this.state.text is never evaluated and not set as the button text.
Wallaby.js tracks coverage for logical expressions and conditional operators, as you may see it supports JSX as well (and ES6 and many more technologies).
Using wallaby.js context actions you can quickly jump to the failing test or the error source, display tests that are covering some particular line of code, inspect console.log output of each individual test, full error stacks and expectation errors, and much more.
Let’s try to make one of our tests fail:
Immediately as we do so, wallaby.js displays the expectation error right where it occurs. The test path line indicators become pink, the source of the error line indicator is now red.
Apart from displaying errors, where and when they occur, wallaby.js also displays console.log output in a similar manner, so if you’re a fan of console.log, wallaby.js can make you very productive. Now you don’t have to leave your editor anymore to console.log all the things.
Finally, if you would like to see what is actually displayed when wallaby.js runs your tests, you may use “Show last screenshot” context action to get a realisation that your app is not just a bunch of components but is something alive.
Please note, that you have to run a test, that you’d like to see a screenshot for, by using “Run scope test(s)” action within the test first. The reason is simple - normally you have many tests and there’s also some tear down code in the afterEach function. However, when you run one specific test, wallaby.js makes a screenshot before the tear down code is executed.
That’s it for the blog post, thanks for reading and hope it helps you to get started with wallaby.js in your React project. Follow us on twitter to stay updated.
8-bit Super Mario Bros was the very first video game that I have played as a kid. Later there were no less awesome Battle City, Chip ‘N Dale, Teenage Mutant Ninja Turtles, Duck Tales, Battletoads, Darkwing Duck and many more. Those happy days, when I couldn’t even imagine that I’m going to become a programmer.
Many years later, when I became a programmer and had spent several years in the industry, I was watching the “Inventing on Principle” talk by Bret Victor. I am pretty sure, many of you have seen the talk, and even know a few software development tools inspired by it or just following the similar ideas.
As many of you, I have been amazed how in the presentation Mario looking dude jumps higher as we change the velocity, or how the tree blossoms right when we change the code.
We are also amazed when in some demos we change some code on a web page, right in DevTools or some other tool, click some button and see the result without the page reload.
These ideas are great and inspiring, but then we get back to our daily job to find out about the cruel reality.
First, it gets annoying very quickly to switch between our code editor and our browser to make Mario jump.
Later, some other developer changes the game level, everything suddenly breaks, it’s 9pm and we sitting at work and manually making Mario jump again and again.
Or worse, your version of jumping Mario is actually a button in a form somewhere deep inside your web application. And to click the button that would run some ‘live’ reloaded function, you have to do several steps each time before that function gets executed.
Hot swapping and live editing does help for CSS and HTML reloading, can also help when you are debugging JavaScript and would like to quickly change some very simple stuff. But then you make a change to your JavaScript code and your live editing tool can’t catch up and the whole page reload is required. All because what seemed as a trivial change to you, is often a high wall for ‘live’ editing solutions and code hot-swappers. And they simply can’t jump over the wall, no matter how hard they try and excel in what they do. The issue is not only in technology, it’s also the approach that matters.
So, why does it look nice in all those presentations and doesn’t work for you?
The reason is simple and obvious. Your application complexity goes beyond simple demos and vanilla live editing approaches don’t scale. You don’t just have a simple setInterval/setTimeout/requestAnimationFrame callback or a single form hosted right in your index.html. Your code changes are not limited to some easily hot-swappable ones.
Moreover, you pretty much always have to set up some context before executing any code and there’s no auto-magic solution to create/restore a desired context for your hot swapped code execution. You may need to manually take like 5 different steps before freaking Mario can jump or before you can click that button again to trigger your hot-swapped code. And all that ‘live’ and ‘hot’ quickly become no more attractive than your old-school coding approaches, if not less attractive.
So, is truly live JavaScript editing with instant feedback even possible at all in real-world apps?
The answer is yes. Automated and instant feedback beyond simple prototypes is possible with recorded, runnable, relatively small/fast and isolated scenarios. We have had the name for those for a long time and the name is tests. TDD/BDD or not, Given-When-Then or Arrange-Act-Assert, test first or after, or mixed - the important thing that tests have to be written.
When you are writing and later maintaining the bulk of your application logic, it’s not the visual image of jumping Mario that helps you making your inventions. No doubt, visualising things can help to get things started, then later to get a feeling that it is all real. To get a realisation that your app is not just a combo of your Controllers, Models and Views, but something alive. Surely, you may occasionally check that your Mario looks good and jumps when you press your keyboard keys. You may even write some E2E test for it.
But you don’t need your browser to make your Mario jump again and again. You don’t need to see the sky background every time, you don’t need to press your keyboard keys manually. Not only you can be “inventing on principle”, you can automate your invention process and make it more focused and efficient.
If you need to check something about how Mario jumps, just record the fact that Mario can jump into that hole as a verifiable and fast spec/test. Make it work for you not just once or twice, but when you change the size of the hole, when you change its position, when you change Mario to Luigi, or even to Scrooge McDuck.
So for the most part of your work: get rid of what you don’t need - close your browser, put on your headphones, open your code editor and nothing else, and do the bulk of your work efficiently. Write tests and code, let right tools to run it automatically and without distraction, get an instant feedback as you type.
At the end of the day, it doesn’t matter if your running program is reloaded or not, what is running your program and how it reloads it, as long as the feedback for your code changes is close to instant.
At this point, you may say: ok, but wait a minute. Tests are good, we have a thousand or two and mostly run them overnight or very infrequently, because it’s too expensive to run them on code changes. So how does it relate to live JavaScript editing, and how do I make my tests live?
The answer is using the right tool.
First, running tests that you don’t need to run is a waste of time. If you changed one test or some code that is covered only by few tests, then why do you need to run hundreds of them? You wouldn’t want to complete all levels of Mario game every time you change princess Peach rescue scene, would you?
Second, getting your tests feedback somewhere outside your code editor, or even somewhere far from the line of the code that you are editing, is also not good enough anymore.
The tool in JavaScript land that can make your your tests and code truly live is wallaby.js. Without you having to change your testing framework or use any special APIs in your tests, wallaby runs minimal required set of tests for your changes, just as you type. It displays the feedback immediately and where you need it most.
And if you’d like to get some visual feedback, you can use wallaby feature to display a screenshot of the test result. It supports not only HTML and CSS, but also SVG and Canvas. So if your test makes Mario jump, wallaby can show you jumping Mario, just like the calculator with buttons and screen in this video.
Most importantly, wallaby.js goes way beyond shiny simple demos, it really helps in real-world applications.
Worked on reducing down the 30 second wait for 1800 angular unit tests to run in Karma. Got it down to, well, instant with @wallabyjs :D
Wallaby.js goal is to teach how and help the community to write testable and tested JavaScript applications of any scale with an immediate feedback from the tests. We would like to support as many code editors as we can, to bring wallaby love to everyone, from Vim users to various IDE users. Future plans include exposing more APIs and even gradually open sourcing the core of wallaby.js or its parts once our business gets a bit stronger. We also have many other ideas on our roadmap and some not yet announced but, trust me, very exciting and ambitious plans.
The technology and the approach (parallel and especially incremental test runs) that we use is unique and highly scalable. Efficient combo of our strict and complex runtime analysis based rules, along with a lot of experience based heuristics, makes wallaby.js a very special and smart tool. Our small team is dedicated to make wallaby.js an essential tool for writing and testing JavaScript, and I am confident that we will do it sooner or later.
Creating and maintaining professional and production quality tools of such scale, working in a variety of environments, using half a dozen of programming languages - not only requires a dedicated and highly motivated team but also an adequate financing. So far, myself and my small team have been working on wallaby.js in our spare time. As of today, I have made a decision to suspend my employment contract and start working on wallaby.js full-time.
It’s a big step for me personally. I knew I would do it one day and was prepared to face it, but when the day comes - it is still very exciting and scary at the same time.
While I have a solid plan to make wallaby.js community focused and sustainable business by selling commercial licenses, I would also like to try to boost wallaby.js evolution and development by trying to attract some additional external financing/investments.
You may already be using wallaby.js in your team and finding it helpful. Maybe you just like the idea and would like to see it in more editors, supporting more technologies and languages, supporting cloud testing, and would like to see it quickly becoming a high quality and affordable instrument for you and your team. In either case, please pass the information to the people you think might be interested in helping wallaby.js to reach its shiny future faster.
That’s it for the post, thanks for reading, follow us on twitter to stay updated. Drop me a line artem.govorov@gmail.com if you have any questions or suggestions.
About a year and a half ago, my career path took a bit unexpected turn. After spending 10 years in product teams and custom development, doing .NET consulting and web programming - everything has suddenly changed. I have caught the virus of developing ‘my own thing’.
From what I see around - it’s a pretty common ‘disease’ in our industry. One day you get bored working in the bloody enterprise software business and your inner hipster demands some revolutionary changes.
My next personal project
The virus symptoms may be different - some are seeking financial freedom and wealth, some just want to do what they want to and not what they are being told to. Your idea may be different - an indie game, next social network beyond geo-location based photo-sharing, PaaS, IDE or another software development tool.
Chapter two. My case history first record.
And I wasn’t an exception. Historically, I have always been concerned that JavaScript, while being so popular, doesn’t have enough good tools comparing to other languages that I worked with. More than enough frameworks, but not enough tools. So my inner hipster made me write a software development tool. It was JavaScript tracing tool, called spy-js.
The success of the tool was quick and even before I had a chance to digest it and make my inner hipster less hungry, spy-js was acquired by JetBrains. I have been offered to join WebStorm team to work on it full time as an independent contractor from home on the warm and sunny Gold Coast, Australia.
Life after spy-js acquisition
Chapter three. Changes and challenges.
The change was huge for me. Regular shaving and pants wearing ceremonies quickly became a forgotten past. My top notch Lenovo ThinkPad was quickly and happily replaced by MacBook Pro, Windows by OSX, Ctrl by Cmd, cmd by terminal, Visual Studio by IntelliJ IDEA, and my long lasting love C# was replaced with at first supercilious Java.
Heading to MacDonald’s in my home outfit
Anyway, not just my inner hipster, but the inner hipster of my inner hipster and his inner hipster were happy. A Russian doll of happy hipsters. Or even a fractal of happy hipsters.
Surely, big changes never come without some challenges. Not everyone can work from home. It takes discipline, concentration, motivation, dedication, and a few other words that end with “-tion”. I always knew I could do it and had some successful experience in past of working remotely. But during the first few months it was very unusual to get used to communicate with your team in realtime only within a tiny couple of hours frame allowed by our time zones.
Thankfully, the majority of the challenges are easy to overcome when your relationship with your company is based on the mutual trust, and JetBrains is one of those awesome companies where many people working from different offices and homes all around the world, doing it happily and efficiently.
Chapter four. When it all not just ends but also begins
Another pleasant challenge was the nature of my new work. I have never been feeling comfortable strictly within the formal boundaries of a software developer duties. Apart from hacking together awesome stuff, I have always had a variety of interests in software development marketing, development process management, supporting users and advocating/evangelising certain things I strongly believe in, such as some software design and testing practices.
With spy-js in WebStorm I had and totally used the great chance to do what covers the majority of my interests. I was able fully implement my ideas in the product, to write blog posts about it, to tweet about new features, to help users adopt it. I have been given a full trust and freedom to do whatever I think is good and bring it to the world with two (and upcoming third) major releases of WebStorm.
Always enjoyed growth hacking
Of course, it took more than one person to make spy-js a successful, reliable and useful tool. I’d like to use the opportunity and thank everyone in my team who has participated in the tool ideas generation, development, testing, marketing, evangelising. And also you - software developers and users of spy-js for your kind words, help and feedback.
The story could end here. Great idea, successful acquisition, nice product, joyful tears and everyone lived happily ever after. Not in my story. My inner hipster didn’t want to rest on his laurels. He woke up again and he’s hungry. But something has changed in him…
Today we are proud to announce that wallaby.js, the smartest test runner for JavaScript, hits version one.
New version is packed with new features and significant performance improvements, not to mention a few mercilessly exterminated bugs. Here is a list of the most important changes:
Node.js and io.js testing support,
ES2015/ES6 support,
React JSX dialect support,
JavaScript file configuration,
Karma-like code preprocessors,
Require.js support.
We have also added a couple of new useful context actions, added a few caching layers to our web server and sandbox to make the tests to even faster, made a few significant performance improvements and bug fixes, migrated wallaby.js internal engine from node.js to io.js, updated a few internally used libraries (such as acorn, lodash, escodegen).
Version 1.0 and beyond
Publicly released just few weeks ago, wallaby.js has already gained a great traction amongst JavaScript developers. As we know, many of you have already been happily using the tool for your daily jobs, helped and are helping us to make it better. Our team really appreciates your help, kind words and encouragement, we are dedicated to keep making your JavaScript development and testing experience better and better.
As you also probably already know, wallaby.js updates itself automatically (with your permission) and is meant to be an ‘evergreen’ tool.
So what does exactly version 1 mean, apart from all these new features?
It basically means that we are now confident to recommend using the tool on everyday basis for your everyday work. By no means we are claiming wallaby.js totally bug-free, nor we’re freezing the existing set of features. Check out what’s on our roadmap and please keep coming up with new ideas and suggestions. So the version number is just a formality to tell you that now, when our idea became a solid reality, we care even more about you and your experience with wallaby.js.
And the great news is that the tool is still free to use. We are still working on the licensing and pricing policy and will announce it in advance, so you have enough time to make a decision about the purchase.
Enough talk, let’s jump to the new features!
Node.js and io.js
When we have just started developing wallaby.js, since we are using io.js internally, our dream was to use wallaby.js for developing wallaby.js. A few weeks ago, the dream came true, and today we excited to release node.js and io.js testing support for everyone.
From what we know (correct us, if we are wrong, in comments), wallaby.js is the first and (for now) the only specialized continuous testing tool for node.js/io.js.
In order to use wallaby.js for testing your node.js code, just specify the environment type in your configuration file, and you are ready to go. Right now we support Mocha framework, feel free to create more framework feature requests in our public repository.
module.exports=function(){return{files:['lib/*.js'],tests:['test/*Spec.js'],env:{// use 'node' type to use node.js or io.jstype:'node',// if runner property is not set, then wallaby.js// embedded node/io.js version will be used// runner: 'node or full path'params:{runner:'--harmony --harmony_arrow_functions',env:'ENV_PARAM1=true;ENV_PARAM2=false'}}};};
Wallaby.js now supports ES6/ES2015 and JSX. ES6 is supported both natively for engines that can execute it and via
code transpilers, such as Babel (former 6to5). You can see realtime coverage for your generators, classes, arrow
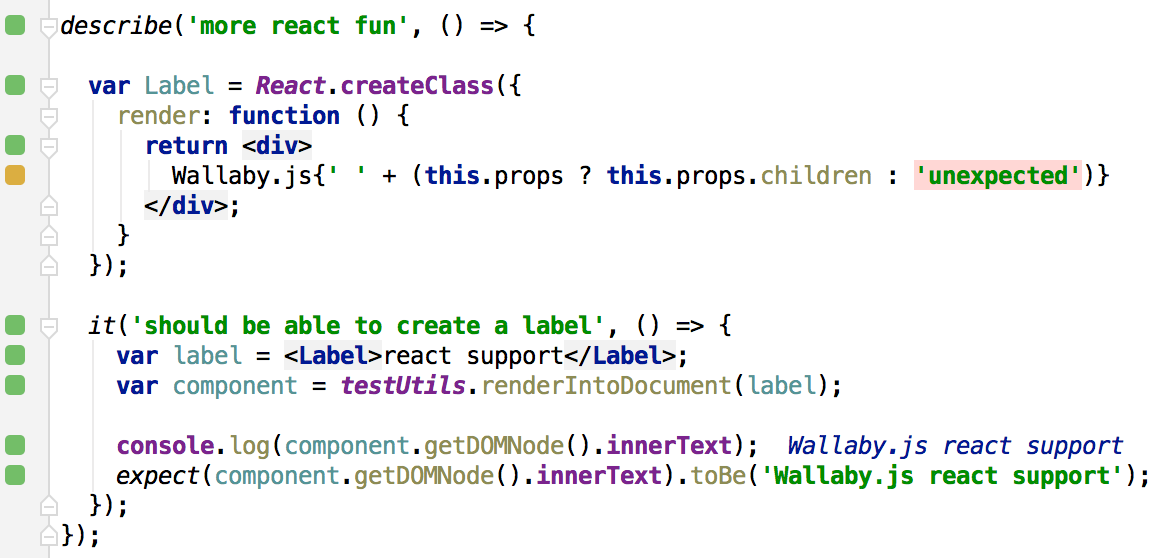
functions and much more with wallaby.js. For JSX, not only wallaby.js understands its syntax, it also
displays coverage inside JavaScript expressions within JSX elements.
Wallaby.js now supports JavaScript file configuration in addition to its existing JSON configuration, as well as Karma-like preprocessors. It means that now you can create files and tests lists dynamically or import them from your Karma config file. With preprocessors you can modify your source files content before feeding them to the test sandbox, synchronously or asynchronously.
We encourage to use existing npm packages and write simple preprocessors without too much ceremony when possible, preprocessor functions however don’t have to be inline (or use ES6), feel free to encapsulate them anywhere, reuse, wrap and adapt karma plugins or other npm packages.
Over time we are planning to expose more and more extension points, but would like to do it carefully to keep wallaby.js public API as simple and clean as possible. In a meantime, Karma to Wallaby adapter could be a nice and interesting open source project.
Require.js support
Last but not least, wallaby.js now supports require.js. The set up is similar to Karma, but easier. Please follow the instructions provided in this sample repository readme file.
That’s it for the blog post, thanks for reading and hope you enjoy using new wallaby.js features. More blog posts are coming the next few weeks, follow us on twitter to stay updated.
In case if you haven’t seen wallaby.js yet - it is an intelligent test runner for JavaScript, that runs your tests and displays the feedback as you write your code. Wallaby.js runs your tests very fast - it uses runtime dependency analysis to only execute tests affected by your code changes and parallel test execution.
In this tutorial, I’ll demonstrate to how to set up wallaby.js for a typical angular.js project and use it in WebStorm. The same way you can also use it in PhpStorm, RubyMine, PyCharm or IntelliJ IDEA.
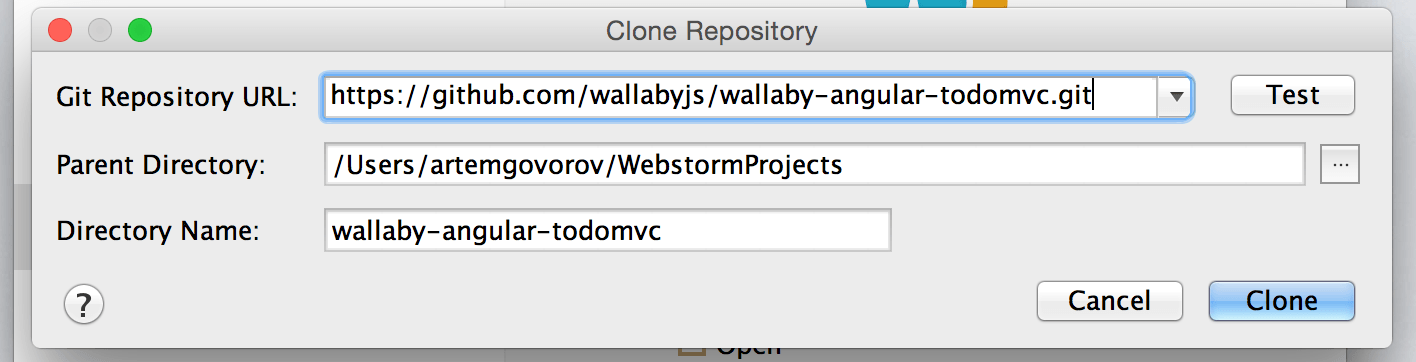
First, open this angular.js todo mvc sample project. You can either clone the repository:
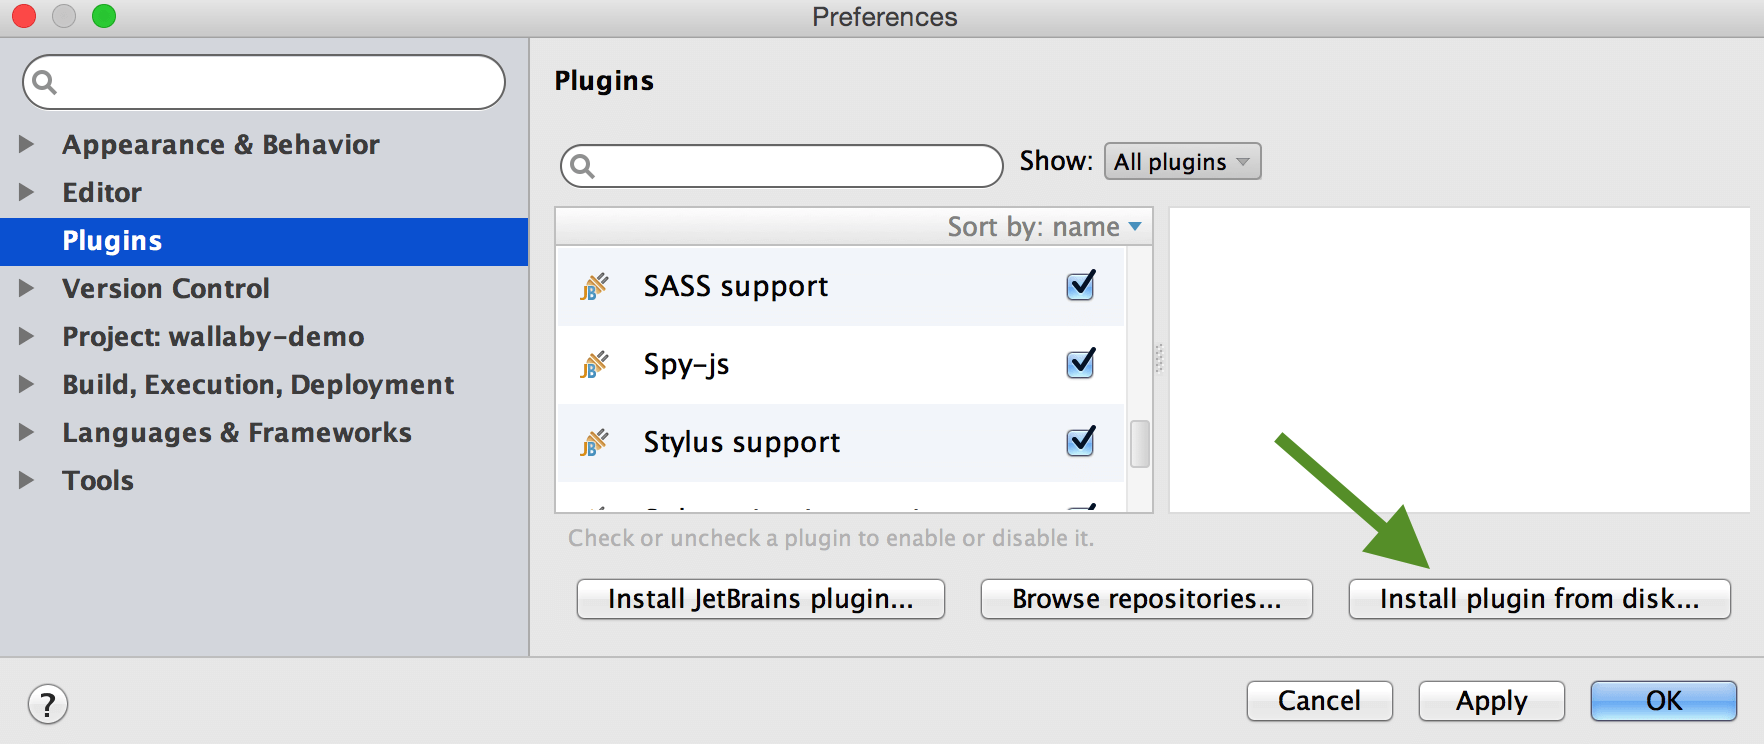
Install it by opening WebStorm settings dialog and using Install plugin from disk button on Plugins configuration page.
Next, we need to install the project dependencies. To do this, run:
npm install
using your CLI, WebStorm built-in Terminal, or just by right-clicking on the package.json file in the project root folder and selecting Run ‘npm install’ action.
Once all the dependencies have been installed, we need to create wallaby.js configuration file. All we need to do is to let wallaby.js know what source files it should track and where our tests are.
Create wallaby.js file in the project root folder and add the following content to it:
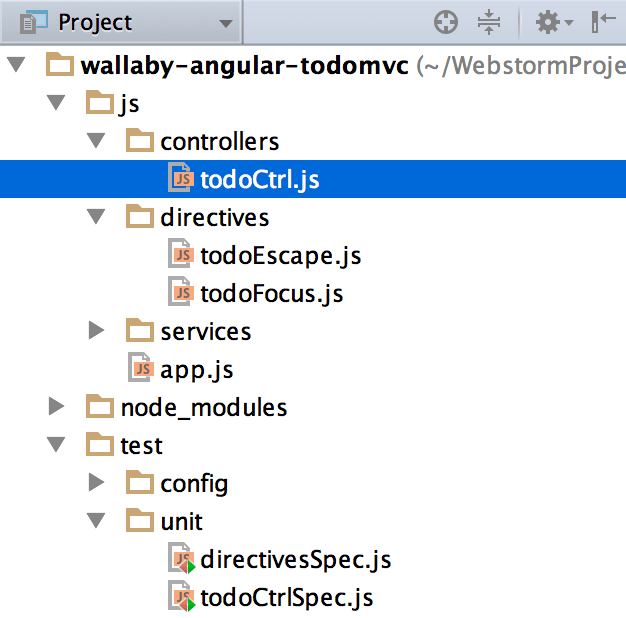
This means that wallaby.js should use angular.js from the installed node_modules, track all source files located in js folder and run all tests located in the test/unit folder.
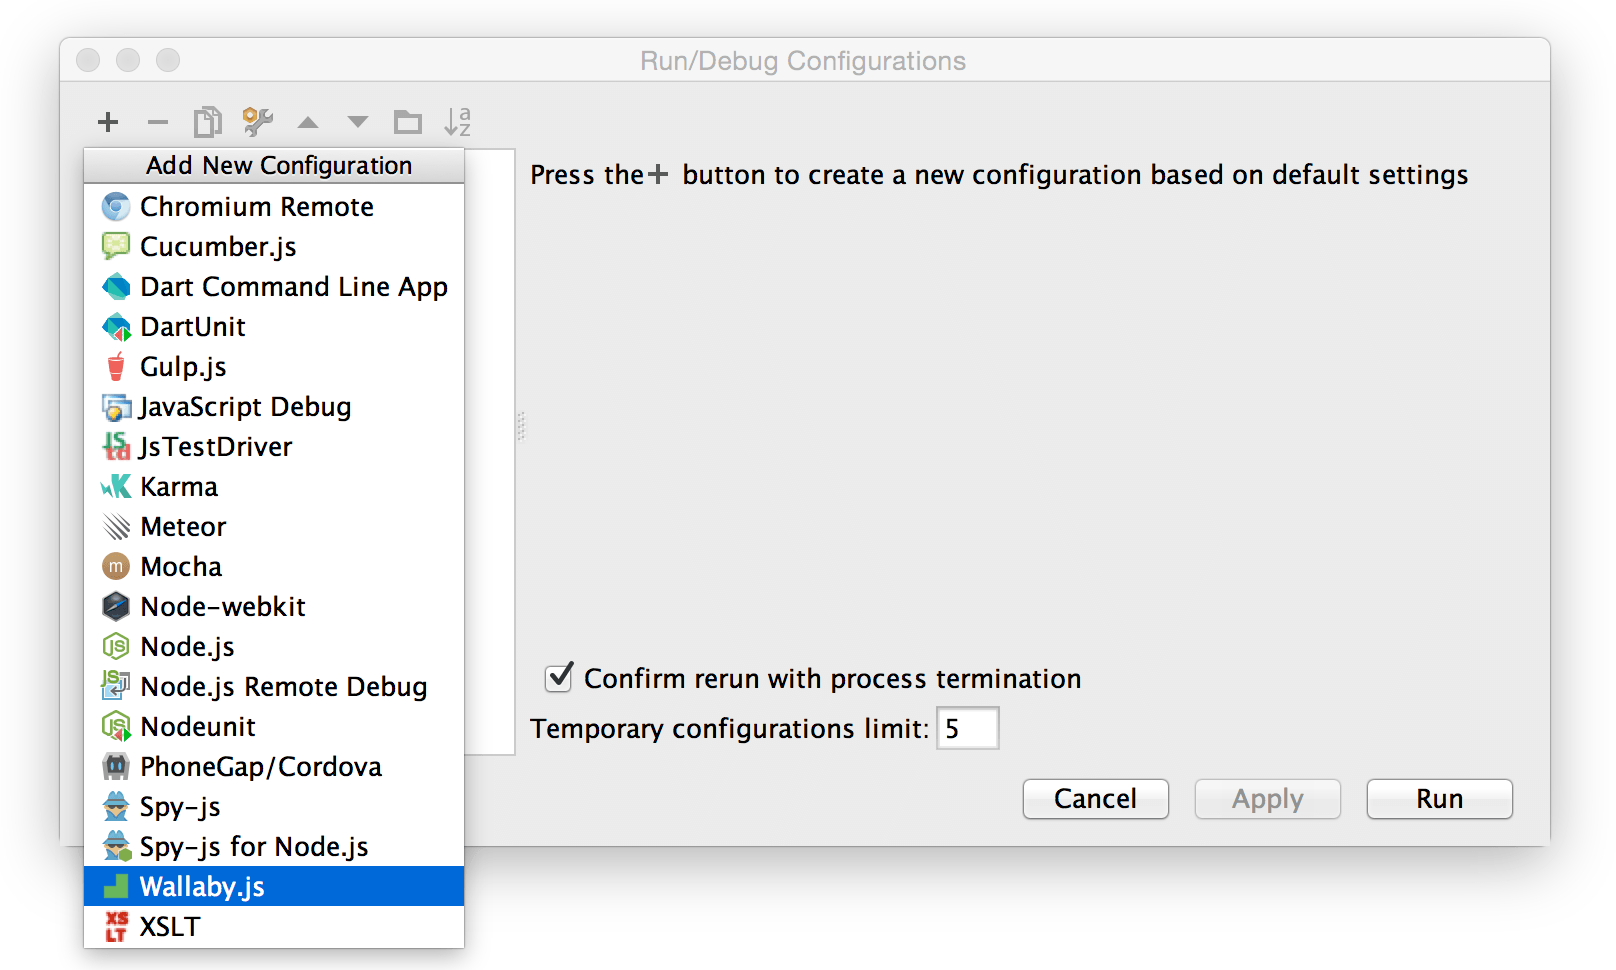
Now we need to create wallaby.js Run Configuration, that we will be using to start and stop wallaby.js. Select Run menu, Edit configurations and create new wallaby.js configuration.
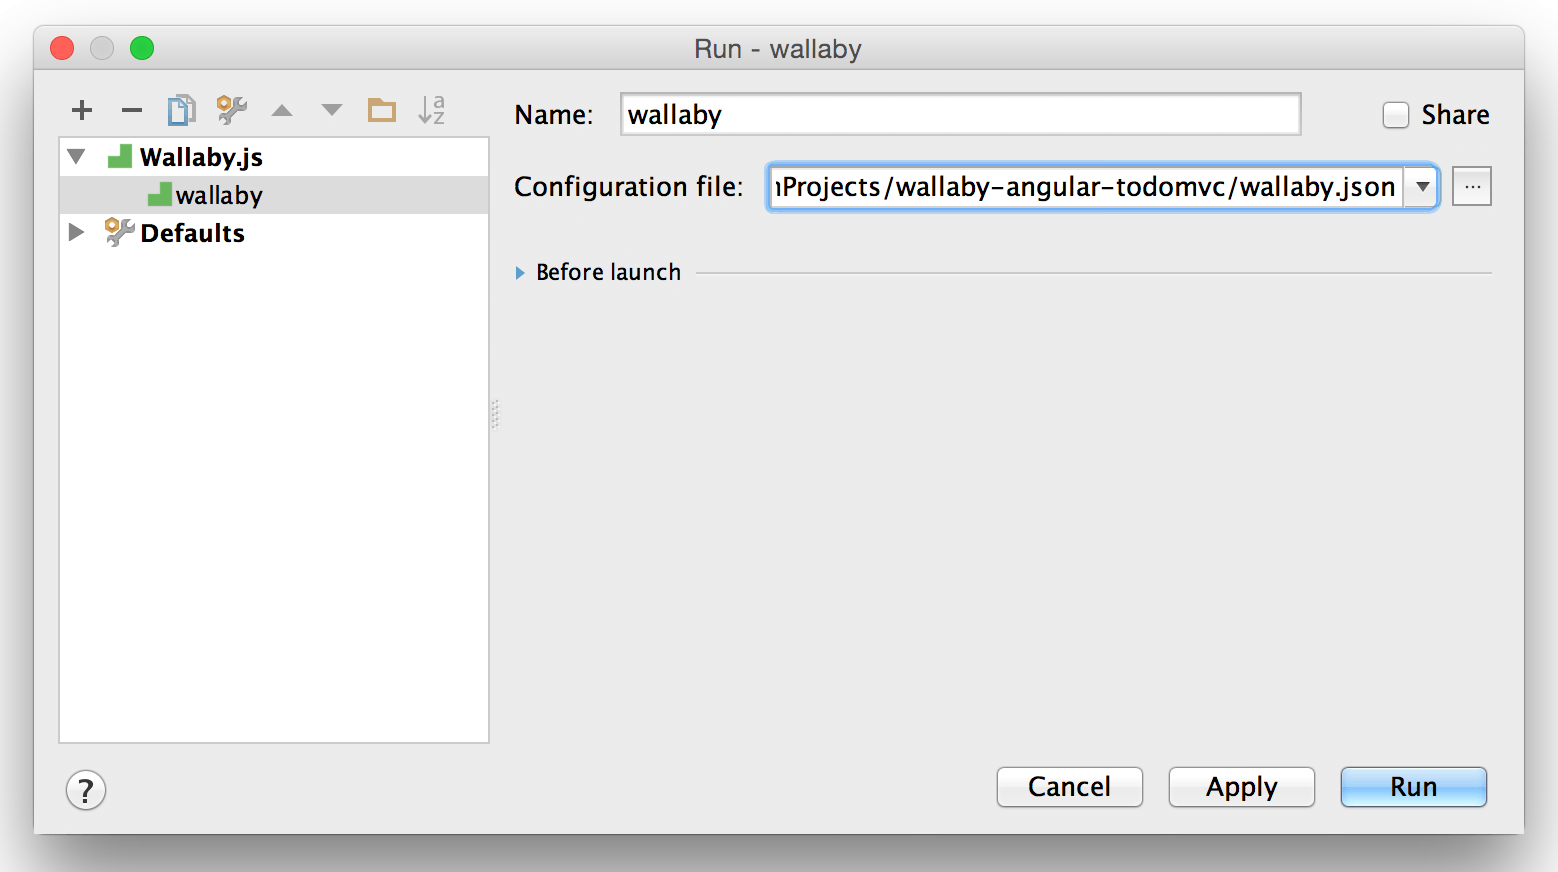
Give the configuration name you like and from the Configuration file drop-down list, select the JSON file we have just created.
We are ready to go now - start the created configuration using Run menu.
When starting for the first time, wallaby.js will download and install some dependencies. Those include node.js, that is used to run wallaby.js, and PhantomJs headless browser engine to run your tests in. The installation may take a minute or so and only happens once.
After the start, wallaby.js displays its tool window at the bottom:
and its status indicator at the right bottom corner of the window.
The indicator displays a spinner when your tests are running, red icon if any of the tests is failing and green icon if all tests are passing. The tool window Failing tests tab displays the information about failing tests, such as error stacks and failed expectation details.
Once started, you don’t need to restart wallaby.js run configuration to run your tests, as it does it automatically, as you change your code. You can even hide the tool window by using the Hide icon in its right top corner, as you will be getting the information about failing tests right in the context of the code that you’re editing. You can always get the tool window back by clicking wallaby.js status indicator.
So, let’s see wallaby.js in action. Open one of the application source files, for example angular.js controller todoCtrl.js.
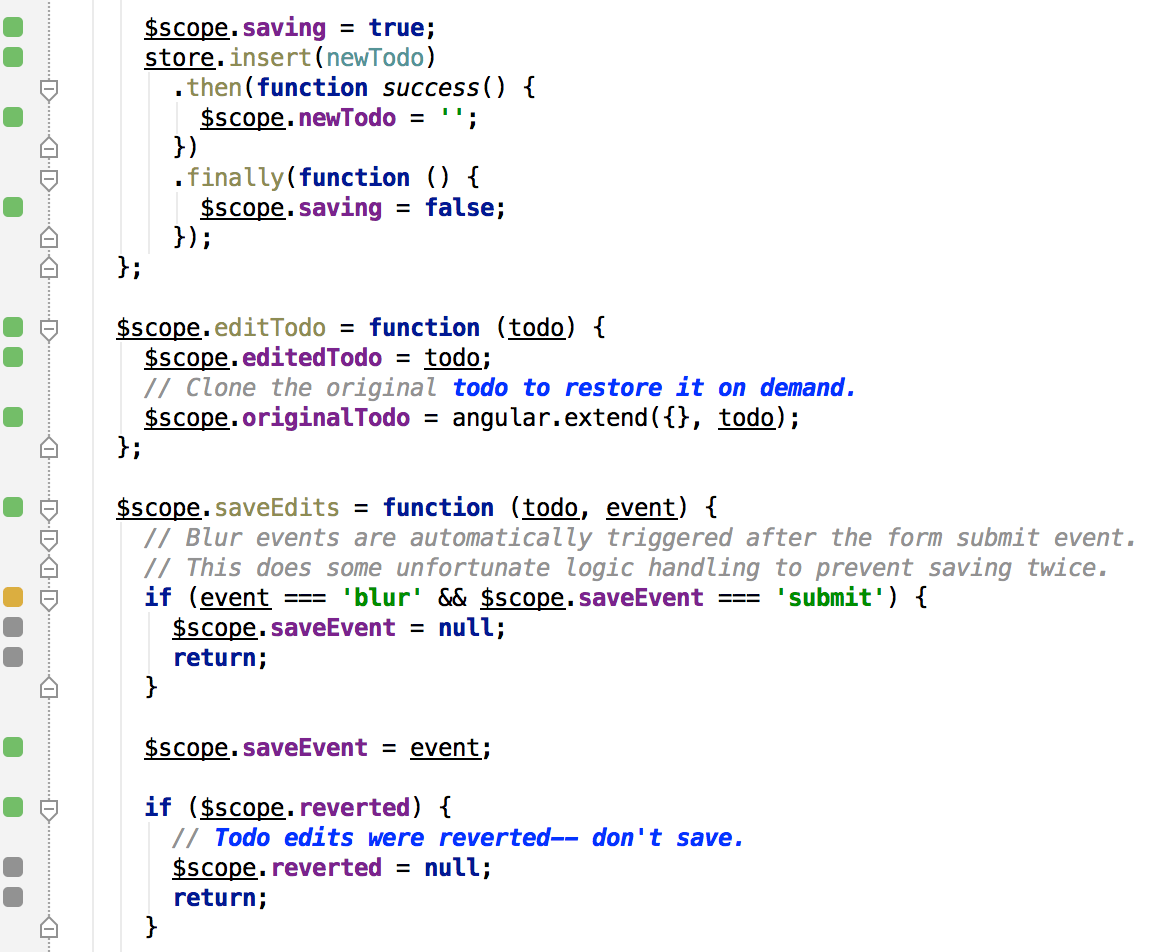
When wallaby.js is up and running, you should be able to see coverage indicators in the gutter of the code editor.
Gray square means that the source line is not covered by any of your tests.
Green square means that the source line is covered by at least one of your tests.
Yellow square means that the source line is only partially covered by some of your tests.
Red square means that the source line is the source of an error or failed expectation, or is in the stack of an error.
Pink square means that the source line is on the execution path of a failing test.
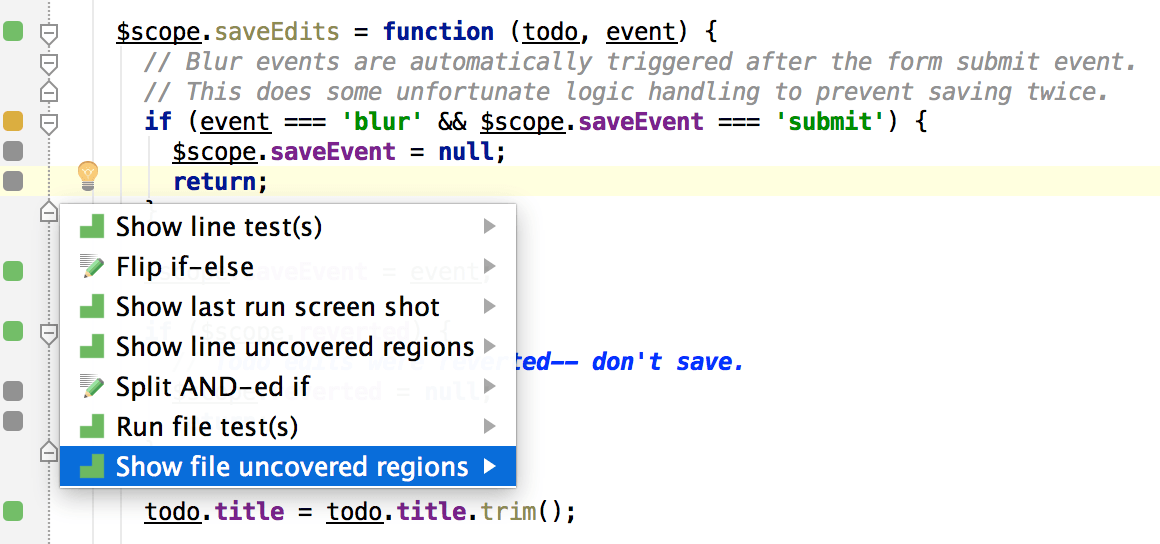
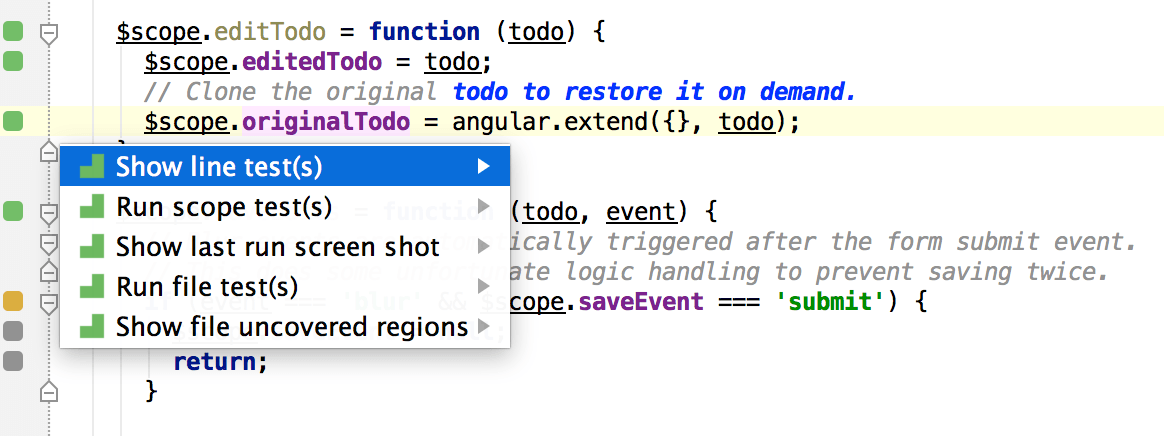
On any line of the source code you can hit Alt + Enter (or use the light bulb icon) and display wallaby.js context actions. You can read more about all actions in the documentation. For this example, let’s see all uncovered regions of the source file that we have opened.
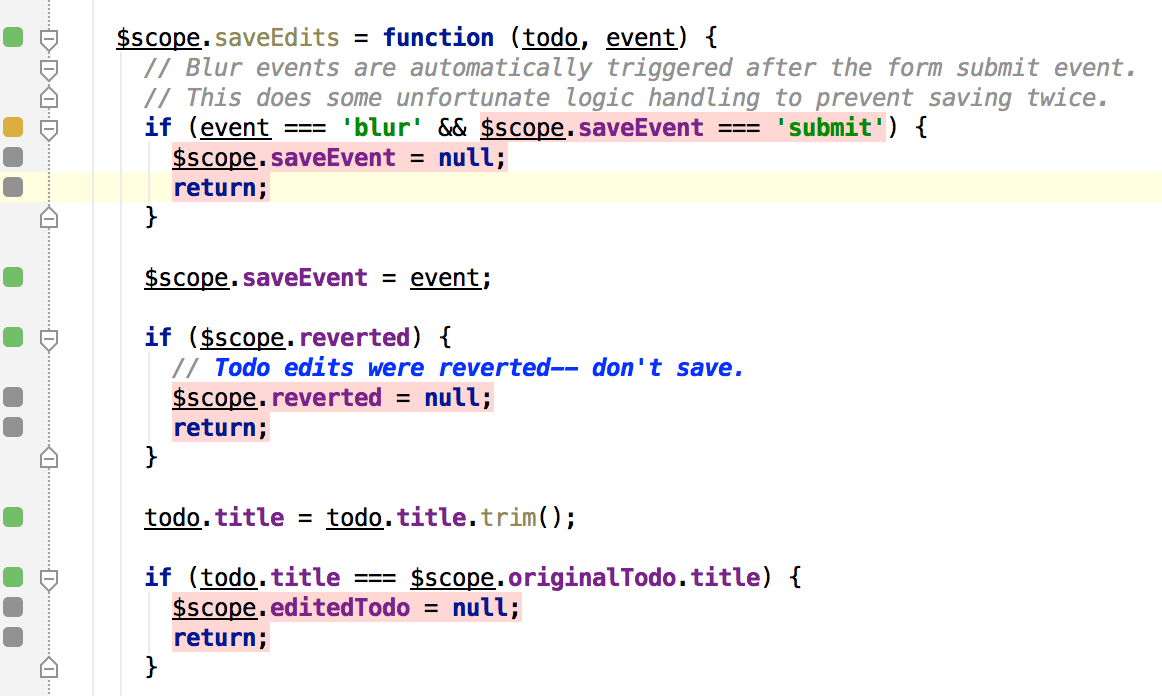
We can now clearly see what is exactly not covered inside the line with the yellow coverage indicator, because wallaby.js tracks coverage for logical expressions and conditional operators as well.
Now, let’s see what tests are covering the source file. To do that, on any line hit Alt + Enter and select the Show line test(s) action.
Tests window is displayed and all the tests that are covering this line of code are displayed inside. If any of the tests is failing, then full error stacks and expectation errors are displayed as well.
The window is searchable with Ctrl/Cmd + F and all the links inside it can be clicked using your mouse or used from the keyboard with Ctrl/Cmd + B shortcut. You can hide the window by hitting Esc.
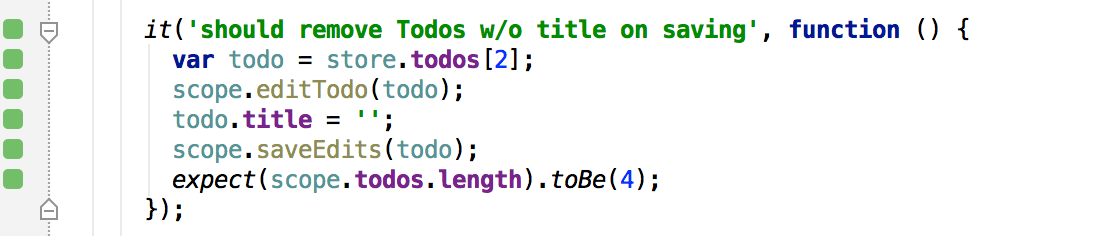
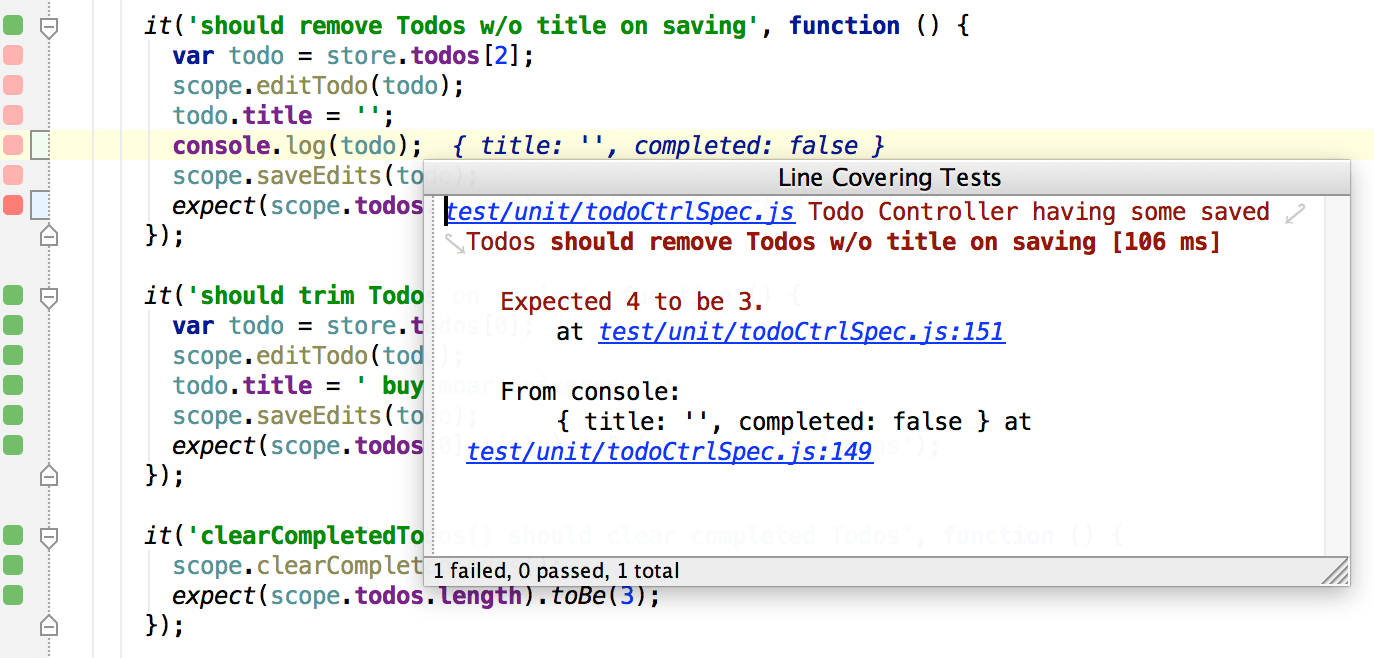
While inside the window, let’s navigate to one of the covering tests by using the link next to the test full name.
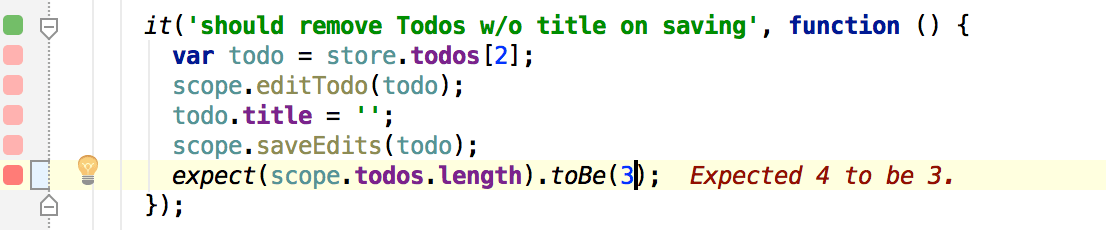
The test is checking that if we change some todo item title to be an empty string, then, when saving items, the item with empty title should be removed. Now let’s change the expectation code to see how wallaby.js reacts.
Immediately as we do so, wallaby.js displays the expectation error right where it occurs. The test path line indicators become pink, the source of the error line indicator is now red.
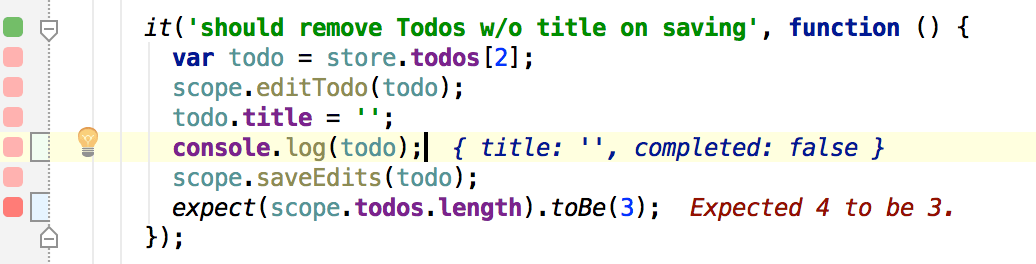
Apart from displaying errors where and when they occur, wallaby.js also displays console.log output in a similar manner, so if you’re a fan of console.log, you are going to love what you see next:
We pass todo object to the console.log and we can immediately see the result. You can output anything and anywhere this way, to quickly inspect the objects that you’re interested in.
Some objects or errors may contain large amount of data, that is not viewable inline. To inspect the full message, you can always use Alt + Enter and invoke Show line test(s) action to see the full output in the context of some source code or a test that you are interested in.
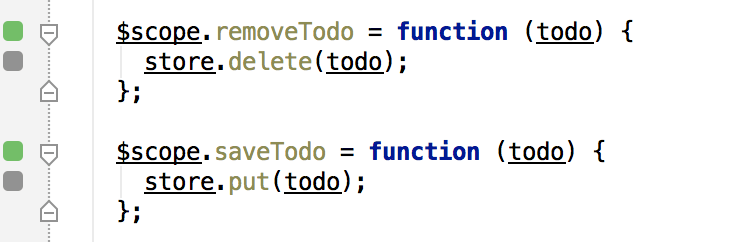
Finally, let’s get back to the controller source file todoCtrl.js, find some uncovered function and write a test for it.
For example, let’s cover removeTodo function with a test. To do that, I will add a new test to one of the existing test files. In the test, I will get one of the pre-created todo items, pass it to the removeTodo function and ensure that the total number of the items has decreased by one.
That’s it for the blog post, thanks for reading and hope it helps you to get started with wallaby.js in your project. Follow us on twitter to stay updated.
Many JavaScript developers understand the importance of writing tests and do use them. There are a few testing frameworks and test runners available in JavaScript land. Some of them are even nicely integrated into some code editors. For example, there’s a nice integration of Karma runner in WebStorm. There are some automated testing workflows, where you can enjoy your tests’ feedback after a few seconds or so (depending on the size of your codebase).
How we use our JavaScript tests
The issue is that an average JavaScript codebase size is growing. We write and test more JavaScript code, but at the same time we want to run our tests faster, because faster feedback means better control over the growing codebase. But when we have hundreds and thousands of tests, even relatively fast ones, it becomes quite a burden to run them frequently, as we write our code. Yes, we’re still running them all as a part of our CI build, we’re inspecting generated coverage reports, we’re using various cloud and on-premises solutions to run our JavaScript tests in different browsers and on different devices. But it doesn’t help us where we’re spending the most of our time - when we are writing the bulk of our application logic.
Each good test we write adds some value, and, in JavaScript, tests are more than just recorded assumptions, But we are not using our tests full potential. They can do much better job than they are doing now. They can run on every key stroke and provide some helpful feedback, immediately highlight found issues in the code that you’re writing. But when we run them all and sequentially - we can’t have it. It’s like having a sports car and only driving it once a day and within a school zone speed limits.
Unleash the full power of your tests
In wallaby.js, I have decided to tackle these issues and build an intelligent test runner, that allows you to exploit the full power of your tests.
First, code coverage is not an option - it’s the must have. But that’s not those boring numbers of coverage percentage I am talking about. When I am writing my code and tests, I don’t care whether I have 89% or 91% percent of my code covered. I don’t want to know if it’s a statement coverage or a condition coverage, when I’m typing my function code. I just want to see coverage indicators right when and where I’m editing my code and without too much distraction.
Second, if I am editing a single test or a function that I know is only covered by a few tests, why my test runner can’t know about it and use the knowledge? I just want it to run everything that depends on my change, everything that may change its behaviour after my change - no more, no less.
Third, if my change requires a lot of tests to be executed and my test files are independent (and they should be), I want to use the full power of my machine and run tests in parallel.
Wallaby.js design is based on the simple principles listed above and is focused on improving your everyday and every minute code writing experience. Inline error/console messages and expectation failures, where and when they occur, test execution screenshots, context actions - these are just few things wallaby.js provides to make you more productive.
With wallaby.js, there’s no longer a wall between you and the full power of your tests. Go ahead, install wallaby.js and release the beast from its cage.
Sometimes I put “console.log” in my JavaScript code just to inspect some latest object values in some deeply nested scopes of my application. Quite often I realise that one “console.log” isn’t enough, so I add more, and so forth. Occasionally I need to modify some objects in the code that I’m tracing on the fly, right from the console, but I don’t have an access to the scope that I’d like to alter.
To address the above listed issues, I sometimes use a simple debugging technique, that I call backdoor debugging. The idea is very simple: instead of (or in addition to) putting one or more “console.log” statements into some nested function scope(s), I am creating a closure in the deepest scope. The closure is doing just one thing: evaluating whatever code is passed into it. For example:
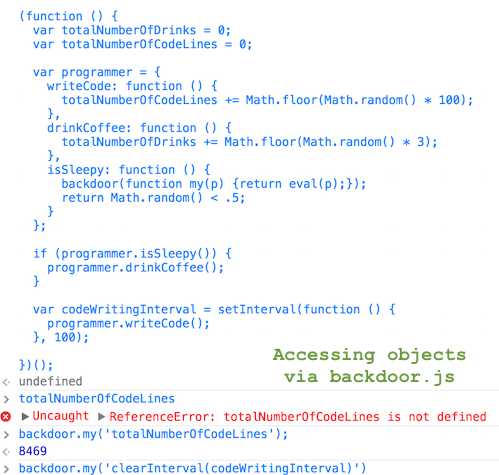
The code is pretty simple: IIFE initializes a couple of variables (that I don’t have an access to from the global scope) and creates a “programmer” object. The programmer drinks coffee if sleepy and then starts writing some code - sounds familiar, doesn’t it?
I have also placed the “backdoor” named “my” inside “isSleepy” function, so now I can run arbitrary code with access to the “isSleepy” function and all scopes it is nested in. Let’s open console and have some fun. For example I can query how many lines of code have the programmer wrote so far, or even forever stop the programmer from writing code (sounds terrible though).
The backdoor function is extremely simple. You can grab the source code from the backdoor.js repository. Any ideas about how to make it even more simple or extend it are welcome.
Everything has its price. Adding a new feature, maintaining an existing one, writing tests. When you are writing and maintaining tests in C# or Java, you are getting recorded and executable scenarios with your assumptions for that price. What about JavaScript, are you getting exactly the same?
Let’s imagine that in the code below, I have covered the “try” block in my tests, but didn’t bother covering “catch” block as I thought it is trivial and not worth testing.
How many problems did I miss? Simple code editor will find nothing. Careful reader may find one or two issues. Intelligent code editor with nice static analysis and spell checker may find all three, though there are many cases when it won’t help either as static analysis capabilities in the dynamic world of JavaScript are limited. Test will find all three errors just as a free addition to its main duty.
So in case if you are still looking for more reasons to cover your JavaScript code, here is one more - JavaScript tests are more cost efficient than in C# or Java, because for the same price you are also getting some form of a compiler for your code.